
How-to: Organization Chart from Database
Organization Chart from Database / DataTable / XML
A comprehensive guide to populating Chart4.NET using databases and DataTables.
Database Samples
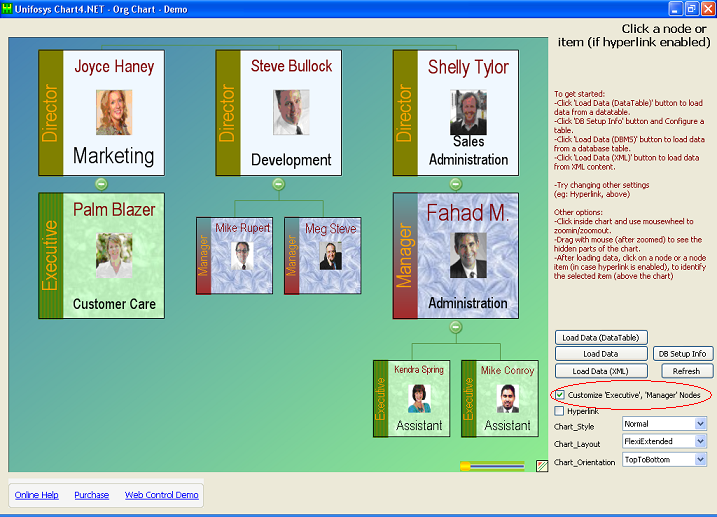
The new Chart4.NET control has enhanced support for node tags and tag-based (group) customization.
- Download source code for Winform database project.
- For the webform sample and online demo, go to the Database Sample (Webform).
Database Setup
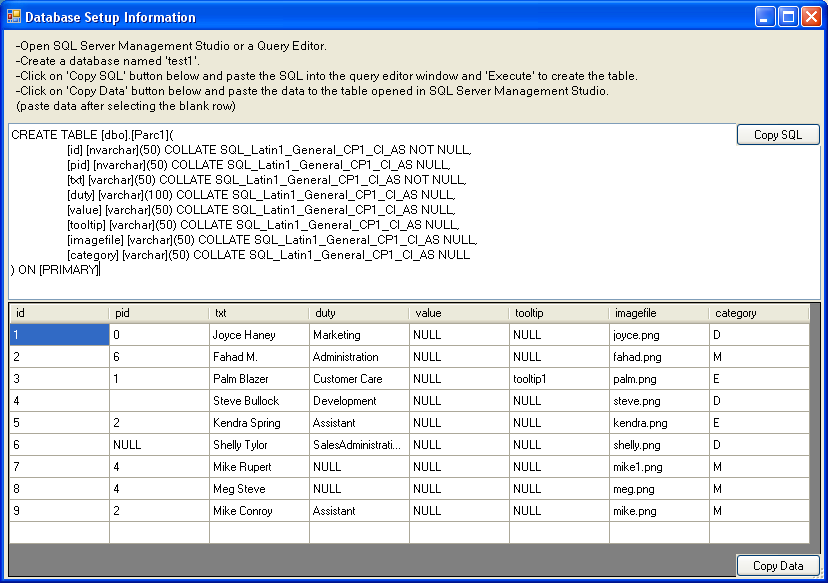
- Open SQL Server Management Studio or a Query Editor.
- Create a database named
test1. - Copy the table creation SQL below, paste it into the query editor, and execute it to create the table:
CREATE TABLE [dbo].[Parc1]( [id] [nvarchar](50) COLLATE SQL_Latin1_General_CP1_CI_AS NOT NULL, [pid] [nvarchar](50) COLLATE SQL_Latin1_General_CP1_CI_AS NULL, [txt] [varchar](50) COLLATE SQL_Latin1_General_CP1_CI_AS NOT NULL, [duty] [varchar](100) COLLATE SQL_Latin1_General_CP1_CI_AS NULL, [value] [varchar](50) COLLATE SQL_Latin1_General_CP1_CI_AS NULL, [tooltip] [varchar](50) COLLATE SQL_Latin1_General_CP1_CI_AS NULL, [imagefile] [varchar](50) COLLATE SQL_Latin1_General_CP1_CI_AS NULL, [category] [varchar](50) COLLATE SQL_Latin1_General_CP1_CI_AS NULL ) ON [PRIMARY] - Insert some sample data similar to the table below:

You can copy and paste the data to a database table from the 'DB Setup' screen within the Database Sample main screen:
DataTable Usage
Instead of directly loading from a database, you can populate the chart from a DataTable created from any data source.
Note 1: The datatable column names can be anything you like. Only the order of values in datatable rows is important. The first column is taken as ID, second as ParentID, and so on.
| Columns | Meaning | Description | Details |
|---|---|---|---|
| Column1 & Column2 | ID & ParentID | Represent the hierarchical relationship of data items. | Two items having the same parentID are children of the item which has that ParentID as its ID. |
| Column3 | Text + Description | The title text and additional lines of text. | Separate using \n. You have to set hpcSettings.Node_IsDataHasText = true; to apply separate formatting for title and additional lines (see the sample). |
| Column4 | Name | Name of the node. | The value given will be returned (on clicking the nodes) and can be further processed. Set hpDrillDownMode to anything other than Navigate. Name will also be used in cases where DrillDownMode is NavigateNode or PostBack. |
| Column5 | Tooltip | Normal rectangular box tooltip. | If not given, the node text will be shown (if hpShowToolTip = true). |
| Column6 | Photo | Photo name. | You can load from files by specifying a relative path in PhotoSpecification and photo name here. Else you can make an imagelist from files or database table streams. |
| Column7 | URL | The web address to navigate to. | To be applicable, you have to set HierarchyWeb1.hpDrillDownMode = Navigate. |
| Column8 | Tag | Category (e.g. Director, Manager) | Customize nodes by assigning custom brushes and other settings for tags. |
Note 2: You can give an empty string for items that have no specific value (except the first 3 columns; root items have a blank PARENTID).
Note 3: See the DatabaseSampleWeb for ASP.NET usage. See DatabaseSample for Winforms (all columns except URL apply for the Winform control).
Note 3: See the DatabaseSampleWeb for ASP.NET usage. See DatabaseSample for Winforms (all columns except URL apply for the Winform control).
Related Articles
Sample Downloads
Live Demos
Was this page helpful?
Thank you for your feedback!
Your input helps us improve our documentation.